The most difficult aspect of this quilt was the ribbon. How can you mimic the Eclipse book cover ribbon with fabric? One that is interrupted by 20 blocks? The easiest way would have been to put the blocks together with sashing, mark up where the outline of the ribbon needed to go, cut out pieces from one color of red, and fuse them on. But then you get an outline of a ribbon, with no depth and the ribbon pieces really wouldn't form a coherent unified piece. Plus it would look like a tacky afterthought, even if it were stitched along the edges. I wanted the ribbon to look like part of the background, not slapped on top.

To achieve the look I was going for, I would need multiple shades of red in order to show that it is flowing and folding around, with lighter and darker areas. I started out by opening an image of the Eclipse book cover in Photoshop. I tried my hand with the pen tool, outlining the ribbon shape, but that still looked blocky. I then tried the magic wand tool, trying to select just certain color sections, but there are too many shades of the color in a high def image to easily select distinct sections.

And then the Photoshop Guru (my husband) gave me a tip that was an "aha" moment. He took one look at what I was doing one evening as we were watching TV on the couch together (I rarely watch TV without doing something else at the same time) and calmly said, "just Posterize it". I stared glassy eyed at him till he told me what it meant, we looked to see if my "inferior" Photoshop Elements version had it (so far it's been able to do everything that the super expensive CS version does), and we tried it out.

I tried to find an official definition/ tutorial on what it does, but everything out there sounds too complicated or tells you how to use it for other things. And I'm not going to make this post a Photoshop tutorial, it's going to be long enough already. Basically it takes your high quality image and reduces the number of different tones in your image. It makes it look more cartoon-like. So I went from the image on top, with who knows how many tones of red....to the image on the bottom, in which I specified I only wanted 4 tones. Three tones was too simple, didn't provide the depth I was looking for, and I didn't want to look for more than 4 different fabrics to use!
So then I went shopping! For
Fairy Frost! Online at our favorite place to shop for FF,
Mary Jo's, of course (the shops around here don't carry more than one or two colors). At first I tried doing this combination of reds: a mottled red batik (for the shadow – don't know what it's called) with Scarlet, Blood, and Pomegranate Fairy Frosts.
As you can see there just isn't enough contrast. There is no definition between the 3 Fairy Frosts. I went looking around again, searching locally and online, and even considered just dying some of the Snow (white) FF I had, but finally found a lighter pink color called Lipstick at
Fat Quarter Shop. I cringed at the pinkness of it, but one thing I have found over the years is that I tend to not use enough contrast and things look washed out. So I rearranged colors and came up with a new quadruple: the mottled red batik with Scarlett, Pomegranate, and Lipstick Fairy Frosts.
The next challenge was piecing it into the background. At first I thought I would piece it with rectangle and half-square triangles into a "rough" ribbon. I even drafted it up that way in my design (see the second picture above). The fact that it wouldn't be a solid background, but would be in the sashing between 20 blocks and 20 quotes was an obstacle. There was no way around the fact that I would be making things more complicated needing to piece around the blocks and quotes. I couldn't think of how to piece it easily, but I did find a wonderful technique for piecing
curves. Fiber artist Dale Fleming has a technique called
"Pieced Curves So Simple" and I looked at this
tutorial on HGTV to figure it out. I'd previously done regular piecing and paper piecing but this is a whole new method, and it was actually super easy. The curves come together nicely, it was the piecing between all the blocks and quotes that had me yanking hair out!
Here is a quick overview of how the curvy parts worked: I drafted up my design to scale in Photoshop, meaning the quilt was to be 58" x 62", and my design canvas size was 58" x 62". It made for a slow file to work with, but I didn't want to deal with scaling. I had the
grid showing on the file and I went through and methodically printed a paper template for each 8" x 10" section that had ribbon on it. I pinned the templates on my design wall behind the prepped blocks and sections of black/grey background fabric sashing. (And if anyone knows a quicker way than manually hitting "print" and giving it the coordinates each time, let me know!) You can see that the ribbon is made up of paper.


Unfortunately I wasn't thinking ahead and did not take photos of the process, but I'll try to describe it as well as I can and include the couple of photos I have. For each section, I cut the separate template colors apart. I used the templates to cut each corresponding fabric, with a roughly 1/2" seam allowance. Then along the inner curve I clipped the seam allowance and folded it over the paper. Using a washable fabric glue stick I lightly tacked down the seam allowance to the back of the paper template. I then lightly ironed it so that it had a crisp edge. I placed the "outer color" (which has the paper template attached) on top of the "inner" color and tacked down just that seam allowance to the bottom color (you can see in this first photo that I've re-taped the two darker reds, cut the shape of the pink and already folded it over the paper template and tacked down to the reds).

Then I peeled off the top "outer color" from it's paper backing to get to the crisp folded edge, and sewed along that seam (in the 2nd photo). Then I removed the paper backing all together, and ironed to smooth it out. I basically "built up" each section this way.

It may sound complicated, and unfortunately I don't have a "tutorial" of my own photos, but it actually is no harder than paper piecing. You just have the extra steps of cutting your pieces into a curves, clipping the seam allowances, and gluing the fabric around the edge of the paper before sewing them together.
This fourth picture shows a clipped edge already sewn onto the reds/pink with the paper removed.
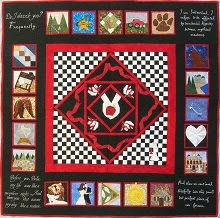
To re-cap the process: I started with an image of the ribbon, I made it into a "cartoon" with only four shades of color . . . and this is the end result:
 !
!